
Unity百游修炼(20)——见缝插针详细全流程(含完整项目及源代码)
在这款 “见缝插针” 游戏中,玩家通过点击鼠标发射针。屏幕上有一个不断旋转的圆形目标,玩家需要在恰当的时机发射针,使针能够准确地插入圆形目标中。每成功插入一根针,分数加一。一旦发射的针与已存在的针发生碰撞,游戏即宣告结束。游戏旨在考验玩家的反应速度与时机判断能力。
一.玩法
在这款 “见缝插针” 游戏中,玩家通过点击鼠标发射针。屏幕上有一个不断旋转的圆形目标,玩家需要在恰当的时机发射针,使针能够准确地插入圆形目标中。每成功插入一根针,分数加一。一旦发射的针与已存在的针发生碰撞,游戏即宣告结束。游戏旨在考验玩家的反应速度与时机判断能力。
二.最终效果
见缝插针
三.素材(含完整项目及源代码)
http://通过网盘分享的文件:jianfengchazhen.zip等2个文件 链接: https://pan.baidu.com/s/1QD0CHNjDmqI3uevoLHG3cg?pwd=1209 提取码: 1209 --来自百度网盘超级会员v5的分享
四.详细制作步骤
1.制作纯色场景
(1)选中Main camera,然后按照图片中标注参数进行修改

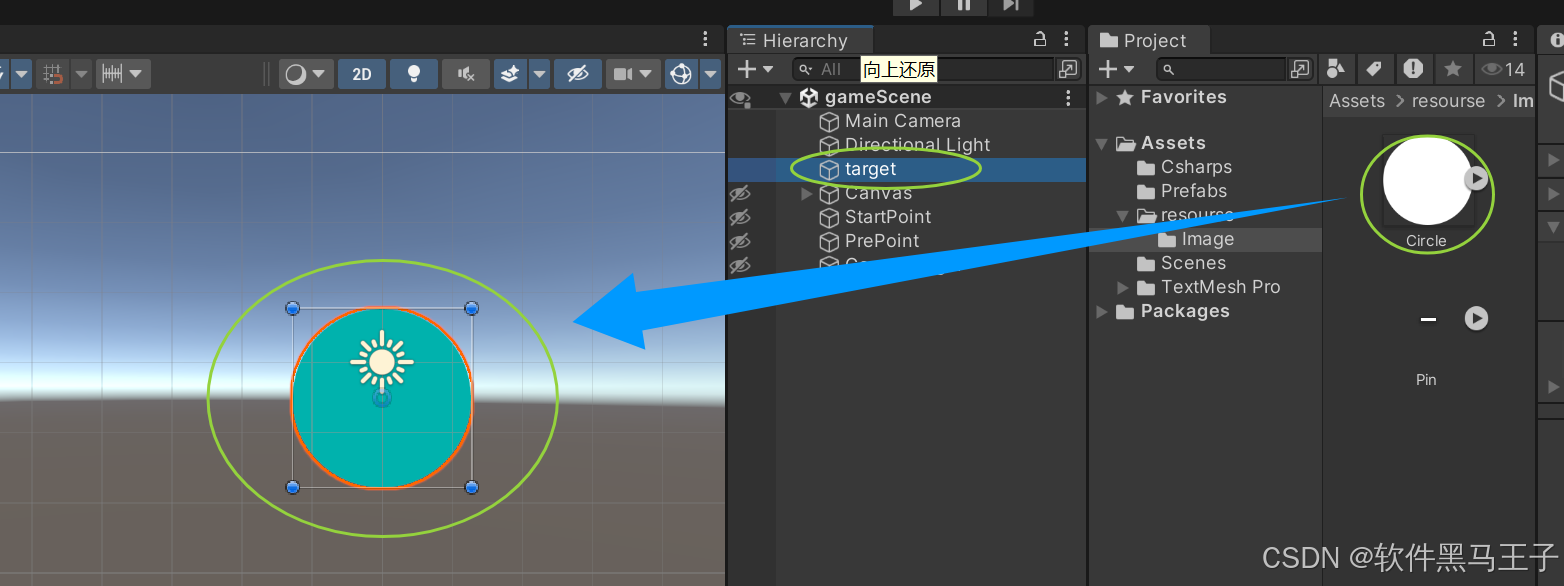
2. 拖入素材圆形 编辑旋转脚本
(1) 拖入素材,并且修改命名(我修改为target)
(2)创建脚本文件夹,在文件夹内创建旋转脚本
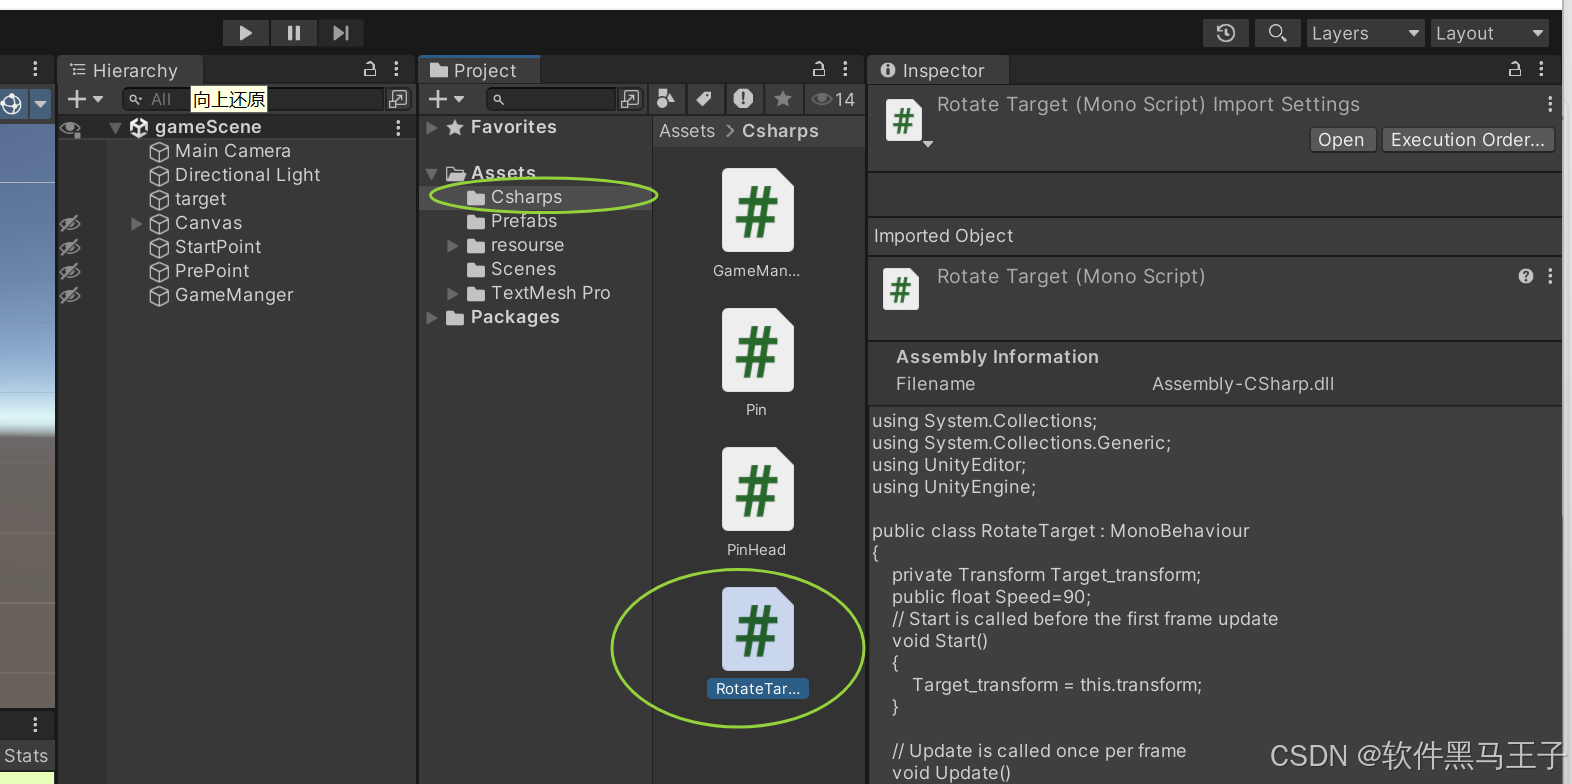
(3)编辑脚本内容
Transform组件记录着游戏对象的位置、旋转和缩放信息 ,脚本中先通过Target_transform = this.transform;获取当前挂载脚本游戏对象的Transform。
Rotate方法用于改变Transform的旋转属性,它接收三个参数,分别对应绕 X、Y、Z 轴旋转的角度。这里前两个参数设为 0 ,即不绕 X、Y 轴旋转;Speed代表旋转速度(度 / 秒), Time.deltaTime是上一帧到当前帧的时间间隔,二者相乘,能保证在不同帧率下,游戏对象都以相对稳定的速度绕 Z 轴旋转,实现了持续且稳定的旋转效果。
using System.Collections;
using System.Collections.Generic;
using UnityEditor;
using UnityEngine;

public class RotateTarget : MonoBehaviour
{
    private Transform Target_transform;
    public float Speed=90;
    // Start is called before the first frame update
    void Start()
    {
        Target_transform = this.transform;
    }

    // Update is called once per frame
    void Update()
    {
        Target_transform.Rotate(0, 0, Speed * Time.deltaTime);
    }
}
3.制作针Pin的预制体
(1)拖入pin素材作为针身体,circle作为针头(pinhead),修改名称
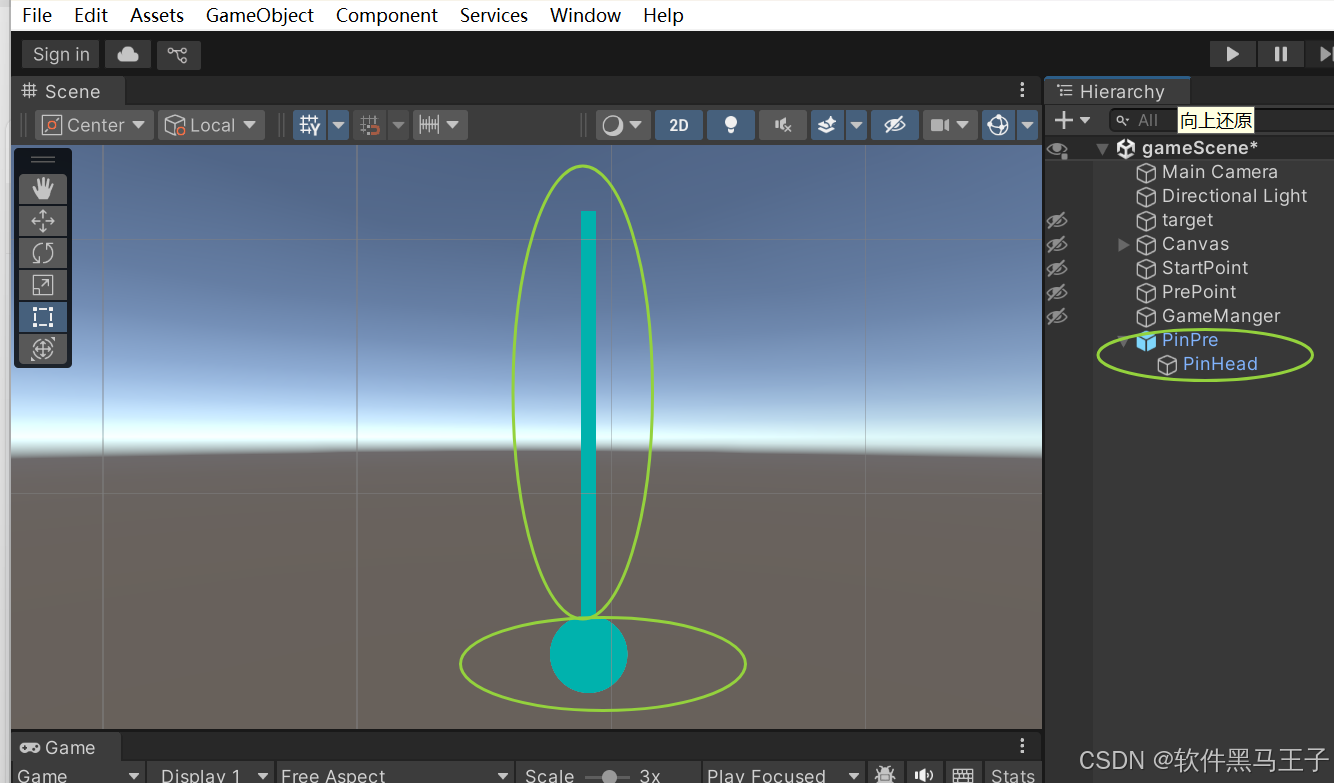
(2) 进行变形和基础变换,形成预制体 针 pinpre,放入文件夹中保存

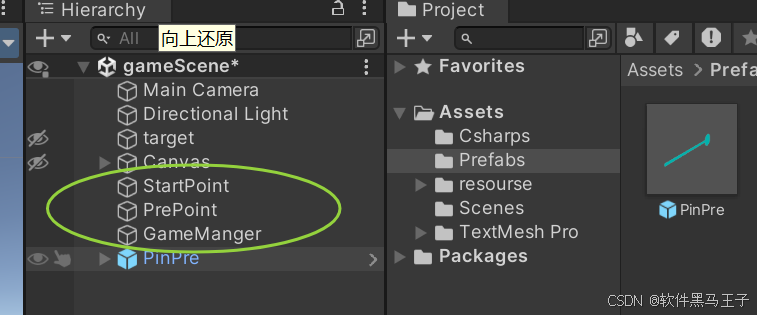
4.在特定位置实例化针Pinpre
(1)创建一个空物体命名为GameManger管理游戏功能,创建两个空物体分别名为StartPoint和PrePoint作为针 的待机位置和实例化位置
(2)创建GameManger脚本
(3)添加实例化代码
using UnityEngine;

// 这个类用于管理游戏中的实例化操作
public class PinInstantiator : MonoBehaviour
{
    // 存储 PrePin 游戏对象的引用,需要在 Inspector 面板中赋值
    public GameObject PrePin;
    // 存储 PrePoint 的 Transform 组件引用,用于确定实例化位置
    public Transform prepoint;
    // 存储当前实例化的 Pin 对象
    private Pin currentPin;

    // Start 方法在脚本实例被启用时调用,这里可以进行一些初始化操作
    void Start()
    {
        // 检查 PrePin 和 prepoint 是否都已正确赋值
        if (prepoint != null && PrePin != null)
        {
            // 调用 ProducePin 方法进行实例化操作
            ProducePin();
        }
        else
        {
            // 如果 PrePin 或 prepoint 未正确赋值,输出错误信息
            Debug.LogError("PrePin 或 prepoint 未正确赋值,无法进行实例化操作。");
        }
    }

    // 该方法用于实例化 Pin 对象
    public Pin ProducePin()
    {
        // 使用 Instantiate 方法实例化 PrePin 游戏对象
        // 第一个参数是要实例化的游戏对象,即 PrePin
        // 第二个参数是实例化对象的位置,这里使用 prepoint 的位置
        // 第三个参数是实例化对象的旋转,这里使用 PrePin 的旋转
        GameObject instantiatedObject = Instantiate(PrePin, prepoint.position, PrePin.transform.rotation);

        // 从实例化的游戏对象中获取 Pin 组件
        currentPin = instantiatedObject.GetComponent<Pin>();

        // 检查是否成功获取到 Pin 组件
        if (currentPin == null)
        {
            // 如果未获取到 Pin 组件,输出错误信息
            Debug.LogError("实例化的对象上未找到 Pin 组件。");
        }

        // 返回当前实例化的 Pin 对象
        return currentPin;
    }
}
5.让创建的针Pinpre移动到合适位置
(1)创建Pin脚本
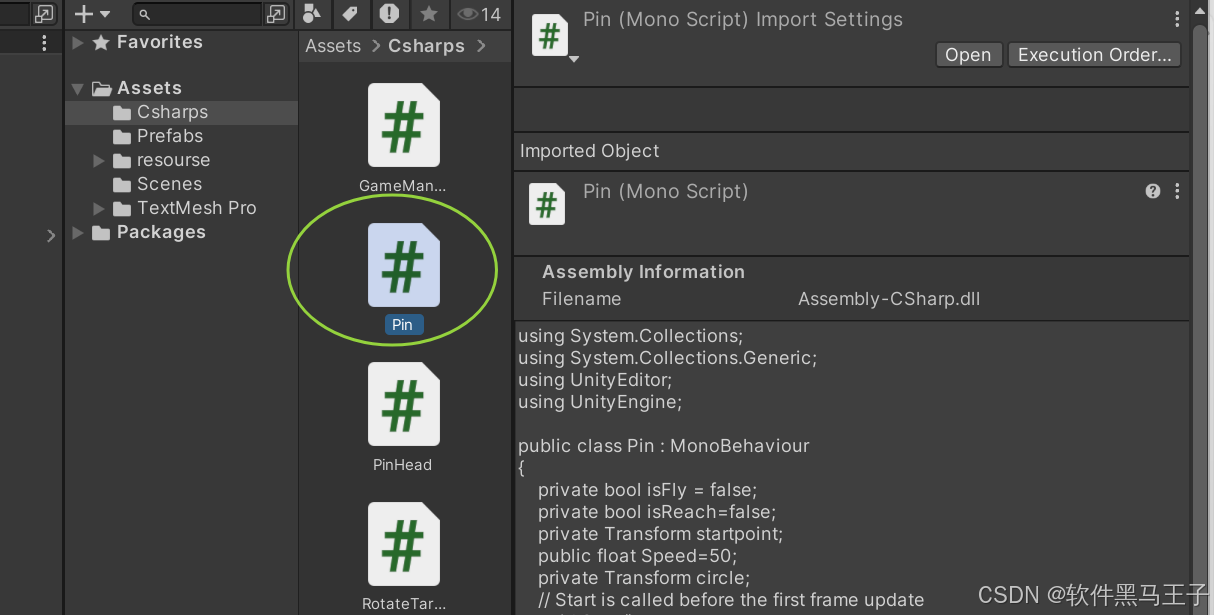
(2)撰写代码
using System.Collections;
using System.Collections.Generic;
using UnityEditor;
using UnityEngine;
// Pin 类,用于控制针的行为
public class Pin : MonoBehaviour
{
// 表示针是否处于飞行状态,初始为 false,即未飞行
private bool isFly = false;
// 表示针是否已到达起点,初始为 false,即未到达
private bool isReach = false;
// 存储起点的 Transform 组件,用于获取起点位置
private Transform startpoint;
// 控制针移动的速度,单位可以理解为单位时间内移动的距离
public float Speed = 50;
// 存储目标圆(这里假设是一个名为 "target" 的游戏对象)的 Transform 组件,用于获取目标位置
private Transform circle;
// Start 方法在脚本实例化后的第一帧更新之前调用
void Start()
{
// 通过名称查找名为 "StartPoint" 的游戏对象,并获取其 Transform 组件赋值给 startpoint
startpoint = GameObject.Find("StartPoint").transform;
// 通过名称查找名为 "target" 的游戏对象,并获取其 Transform 组件赋值给 circle
circle = GameObject.Find("target").transform;
}
// Update 方法在每帧都会被调用,用于更新针的状态和位置
void Update()
{
// 如果针当前未处于飞行状态
if (isFly == false)
{
// 如果针还未到达起点
if (isReach == false)
{
// 打印一个警告信息,这里主要用于调试观察,可根据需要移除
Debug.LogWarning("yunxing");
// 使用 Vector3.MoveTowards 方法使针朝着起点位置移动
// 该方法会返回一个新的位置,使对象朝着目标位置以指定速度移动
transform.position = Vector3.MoveTowards(transform.position, startpoint.position, Speed * Time.deltaTime);
// 检查针与起点的距离,如果距离小于 0.05f,认为针已到达起点
if (Vector3.Distance(transform.position, startpoint.position) < 0.05f)
{
// 将 isReach 设为 true,表示针已到达起点
isReach = true;
}
}
}
else
{
// 如果针处于飞行状态,使针朝着目标圆(circle)的位置移动
transform.position = Vector3.MoveTowards(transform.position, circle.position, Speed * Time.deltaTime);
// 检查针与目标圆的距离,如果距离小于 1.55f
if (Vector3.Distance(transform.position, circle.position) < 1.55f)
{
// 以下原本的代码是想设置一个偏移量让针在距离圆心一定位置处停下,但被注释掉了
//Vector3 offset = circle.position;
//offset.y -= 1.55f ;//让针在距离圆心一定位置处停下
//transform.position = offset;
// 将针设置为目标圆(circle)的子对象,使其附着在目标圆上
transform.parent = circle;
// 将 isFly 设为 false,表示针已停止飞行
isFly = false;
}
}
}
// 该方法用于启动针的飞行,通常在外部调用,比如用户点击操作等
public void StartFly()
{
// 将 isFly 设为 true,表示针开始飞行
isFly = true;
// 将 isReach 设为 true,这里假设针在开始飞行时认为已经到达起点(根据具体逻辑可能需要调整)
isReach = true;
}
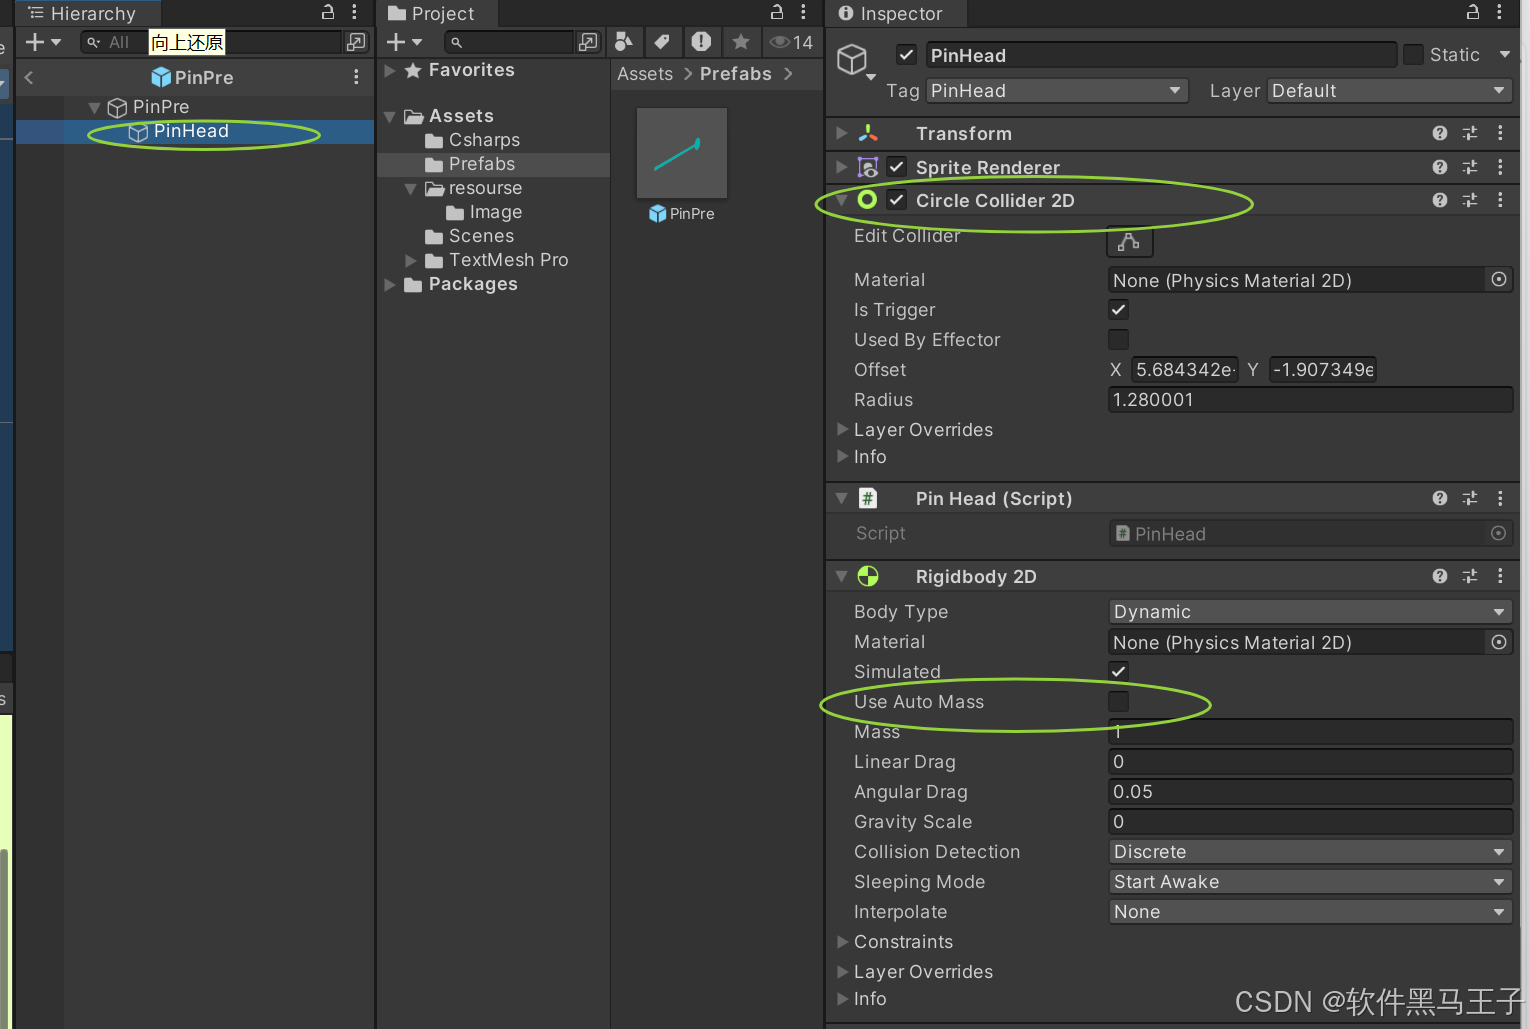
}6.让针具有真实物理行(可碰撞,停止等)
(1)给针头PinHead添加circle collider 2D和Rigibody,取消重力
(2)代码撰写
Pin.cs(部分代码):让针在运行指定位置后停止下来
transform.position = Vector3.MoveTowards(transform.position, circle.position, Speed * Time.deltaTime);
if (Vector3.Distance(transform.position, circle.position) < 1.55f)
{
    //Vector3 offset = circle.position;
    //offset.y -= 1.55f ;//让针在距离圆心一定位置处停下
   // transform.position = offset;
    transform.parent = circle;
    isFly = false;
}
PinHead.cs:碰撞处理
using System.Collections;
using System.Collections.Generic;
using UnityEngine;

public class PinHead : MonoBehaviour
{
    // Start is called before the first frame update
    private void OnTriggerEnter2D(Collider2D collision)
    {
        if (collision.tag == "PinHead")
        {
            Debug.LogWarning("找到了");
            GameObject.Find("GameManger").GetComponent<GameManger>().GameOver();
        }
    }
}
7.鼠标控制和游戏结束处理
(1)鼠标控制
GameManger.cs:
  void Update()
  {
      if (isGameOver) return;
      if (Input.GetMouseButtonDown(0))
      {
          // 播放音效
          if (audioSource != null&&audioSource.clip!=null)
          {
              audioSource.Play();
          }
          score++;
          scoreText.text = score.ToString();
          currentPin.StartFly();
          ProducePin();
      }
  }
(2)游戏结束处理
GameManger.cs:
public void GameOver()
{
if (isGameOver) return;
GameObject.Find("target").GetComponent<RotateTarget>().enabled = false;
StartCoroutine(GameOverAnimation());
isGameOver = true;
}
IEnumerator GameOverAnimation()
{
while (true)
{
Camera.main.backgroundColor = Color.Lerp(Camera.main.backgroundColor, Color.red, speed * Time.deltaTime);
Camera.main.orthographicSize = Mathf.Lerp(Camera.main.orthographicSize, 4, speed * Time.deltaTime);
if (Mathf.Abs(Camera.main.orthographicSize - 4) < 0.01f)
{
break;
}
yield return 0;
}
yield return new WaitForSeconds(0.2f);
SceneManager.LoadScene(SceneManager.GetActiveScene().buildIndex);
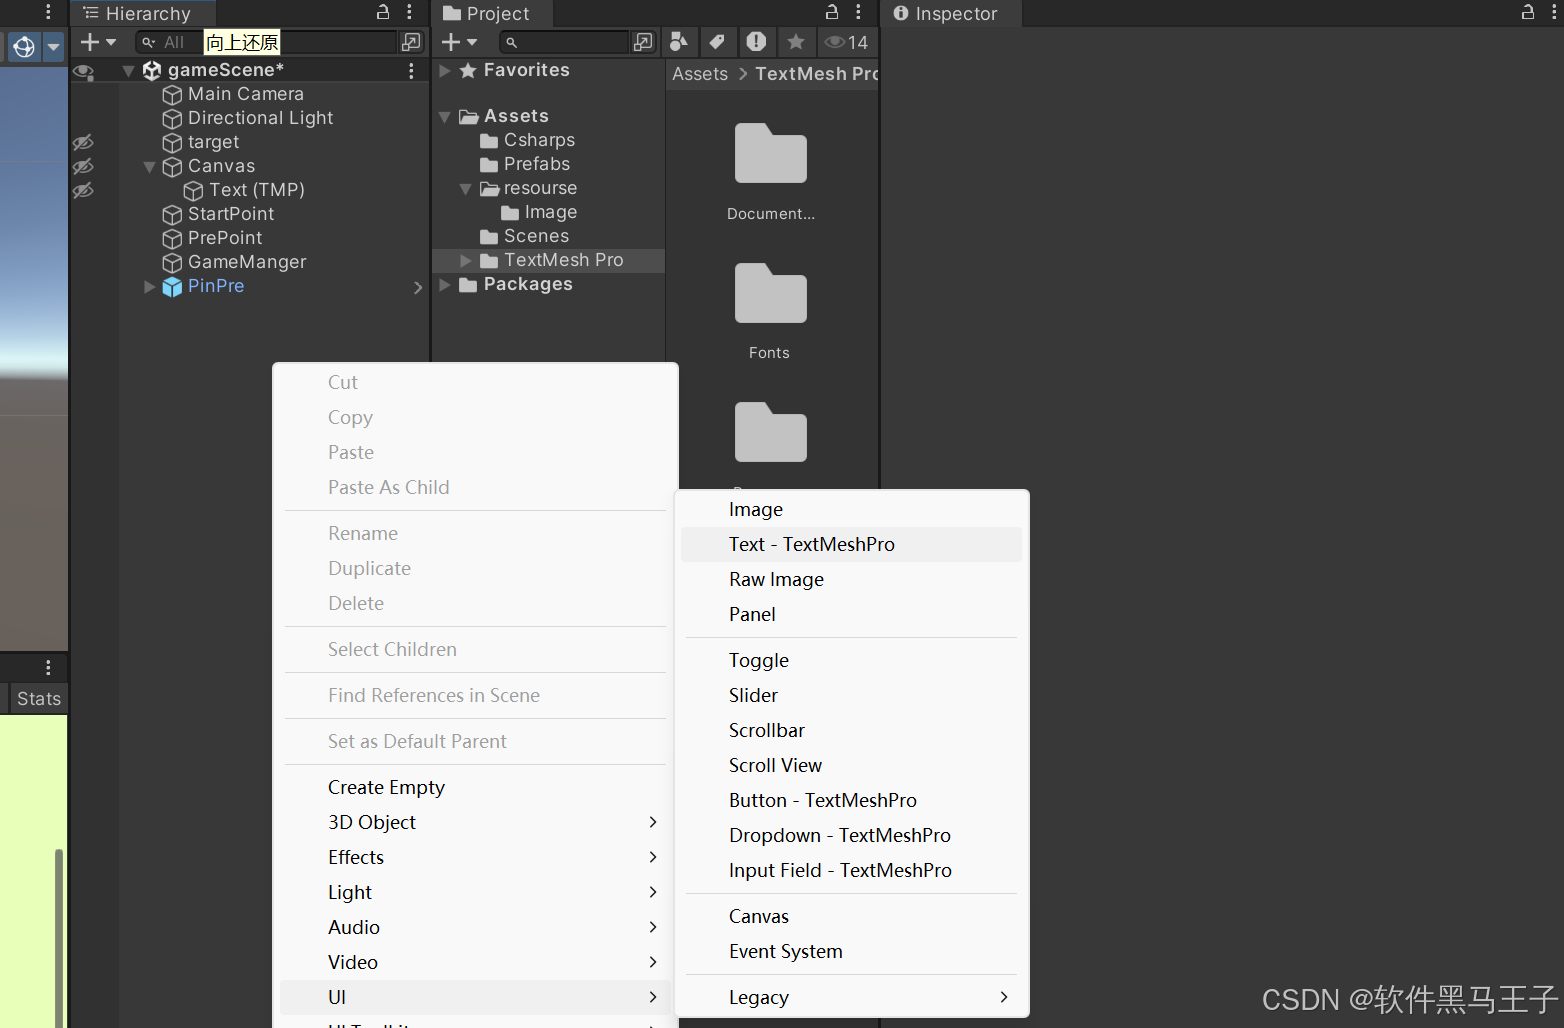
}8.显示分数
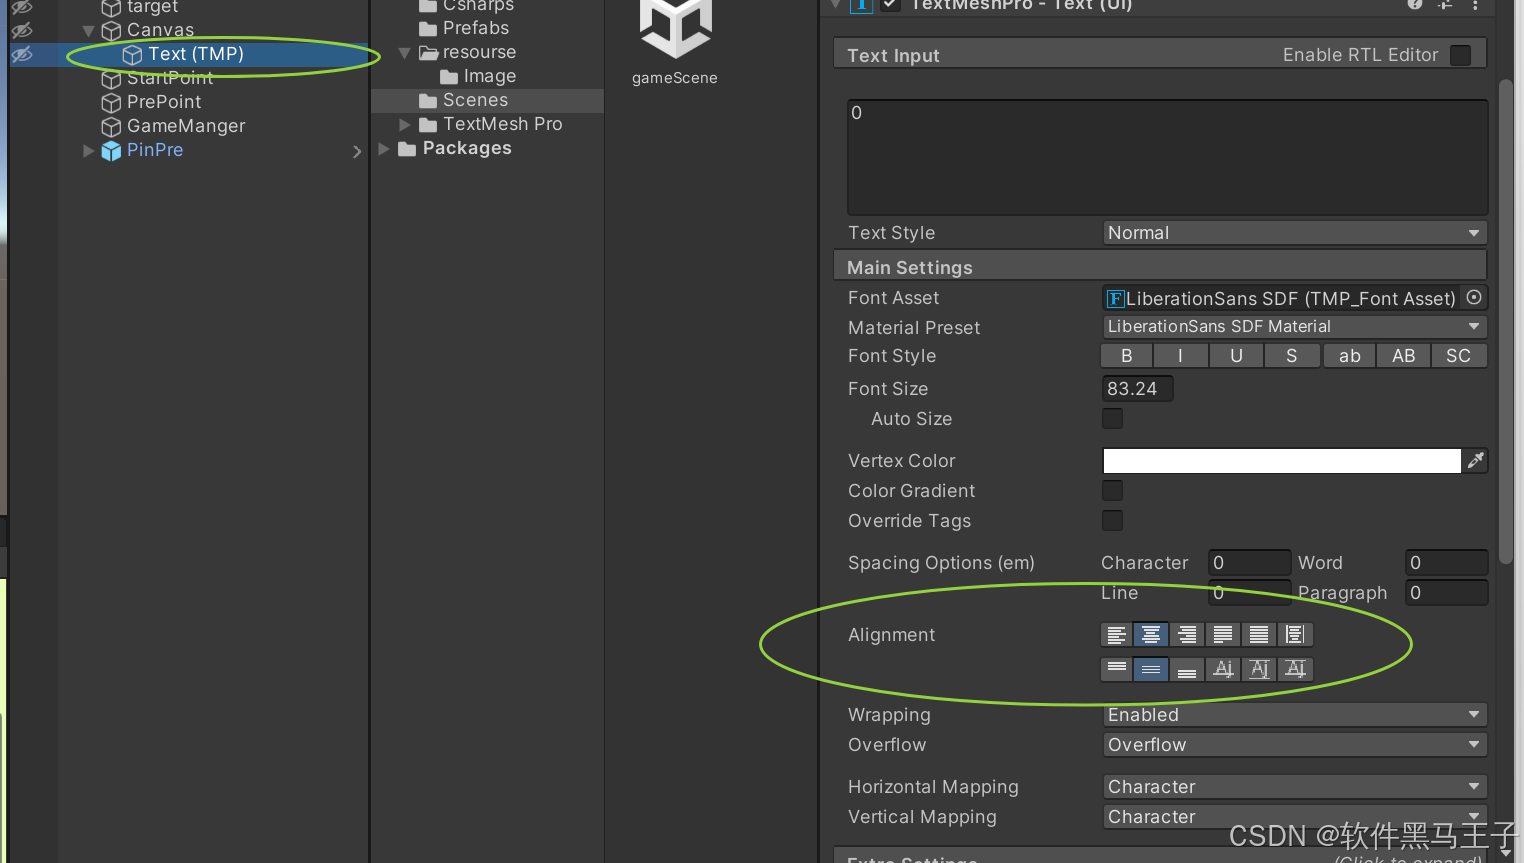
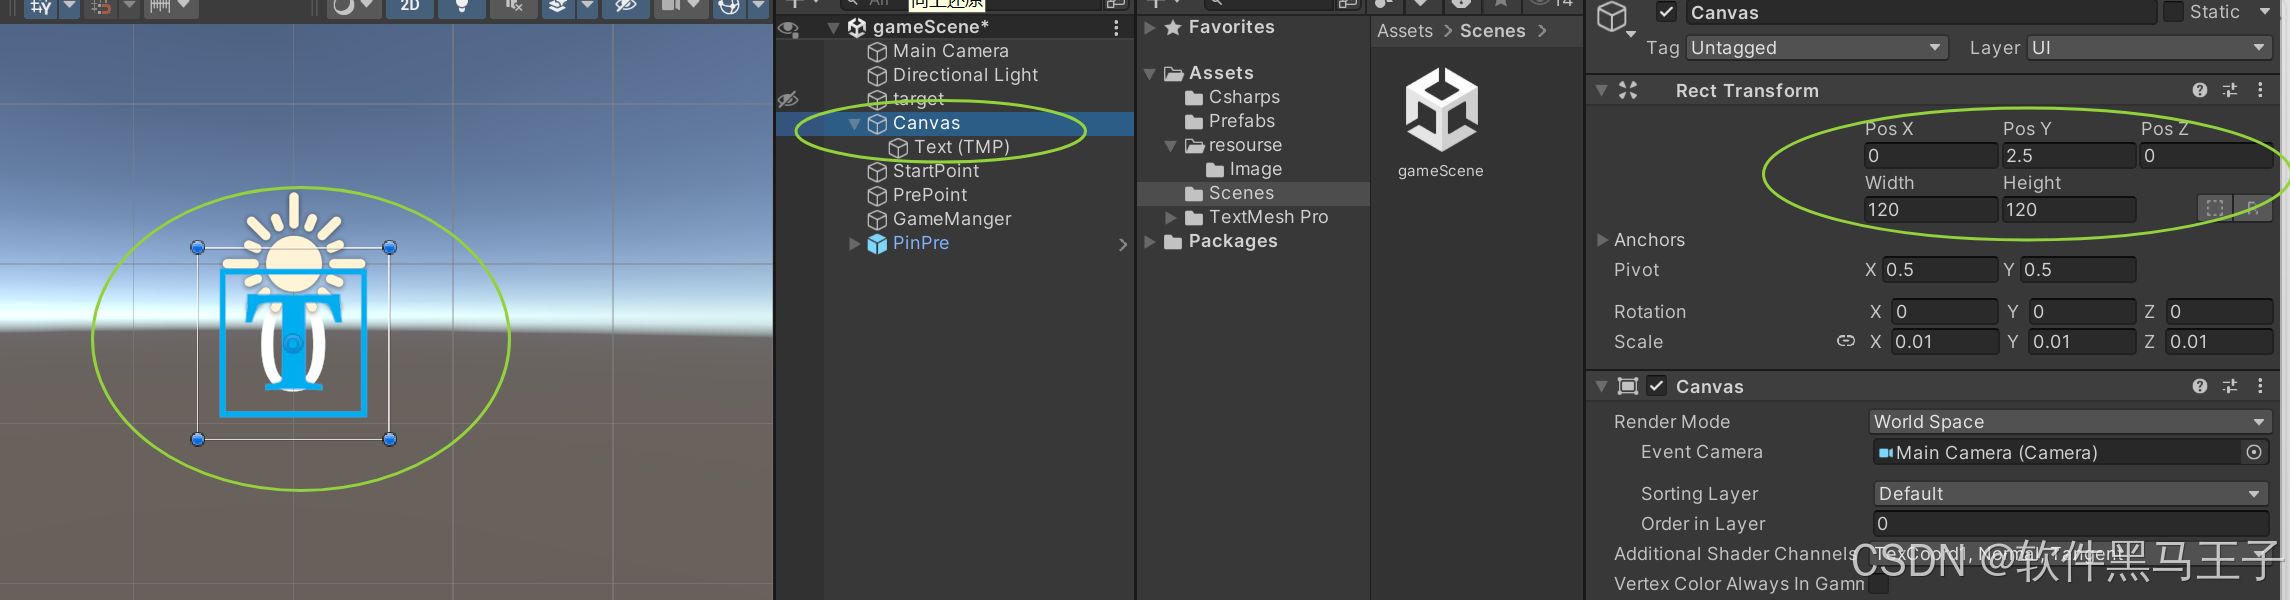
(1)创建Textmeshpro
(2)修改参数如下
记得删除eventsystem(用不到)
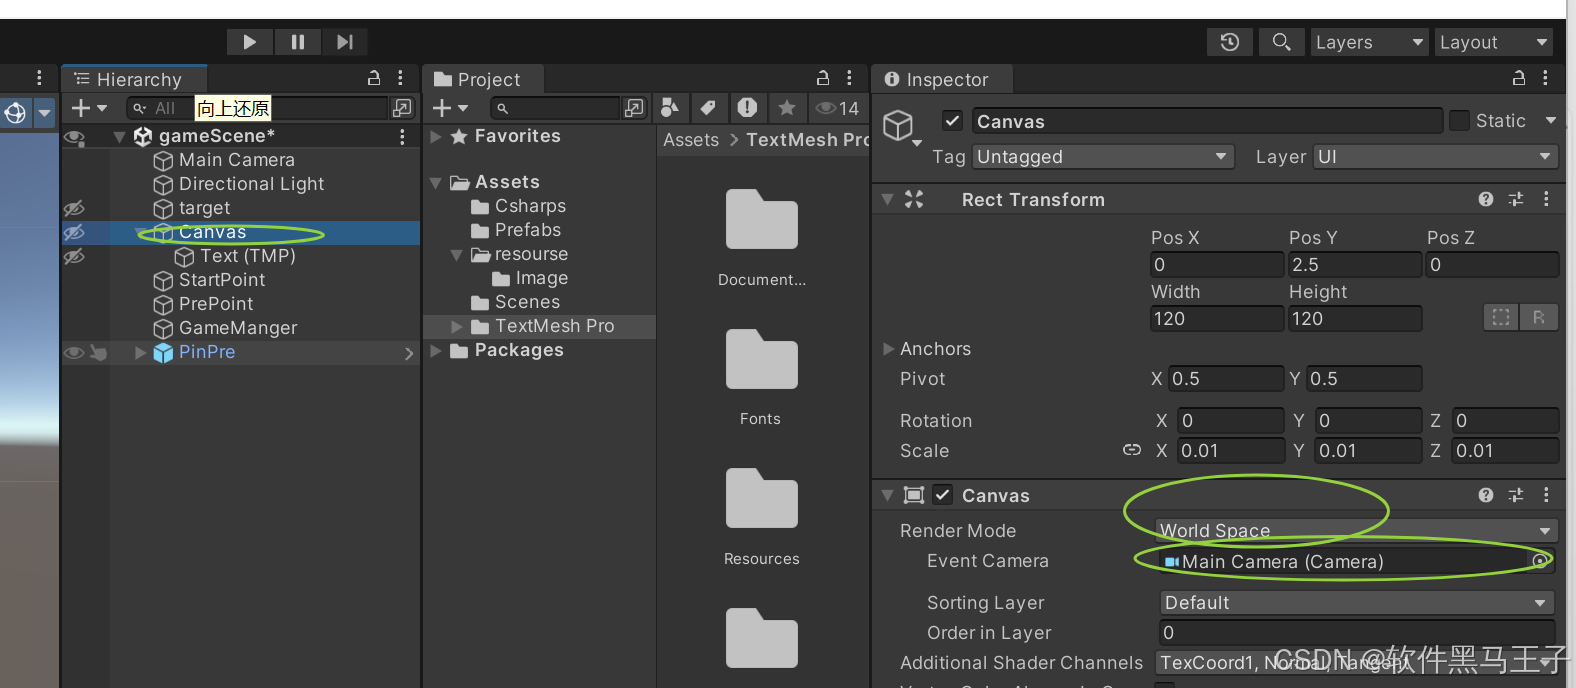
 大小根据自己判断进行修改,如下:
(3)撰写代码
   public TextMeshProUGUI scoreText;
  void Update()
  {
      if (isGameOver) return;
      if (Input.GetMouseButtonDown(0))
      {
          // 播放音效
          if (audioSource != null&&audioSource.clip!=null)
          {
              audioSource.Play();
          }
          score++;
          scoreText.text = score.ToString();
          currentPin.StartFly();
          ProducePin();
      }
  }
9.添加发射音效
(1)在GameManger上添加Audio resource组件,并挂载音效素材,取消播放(不勾选 Play on awake)
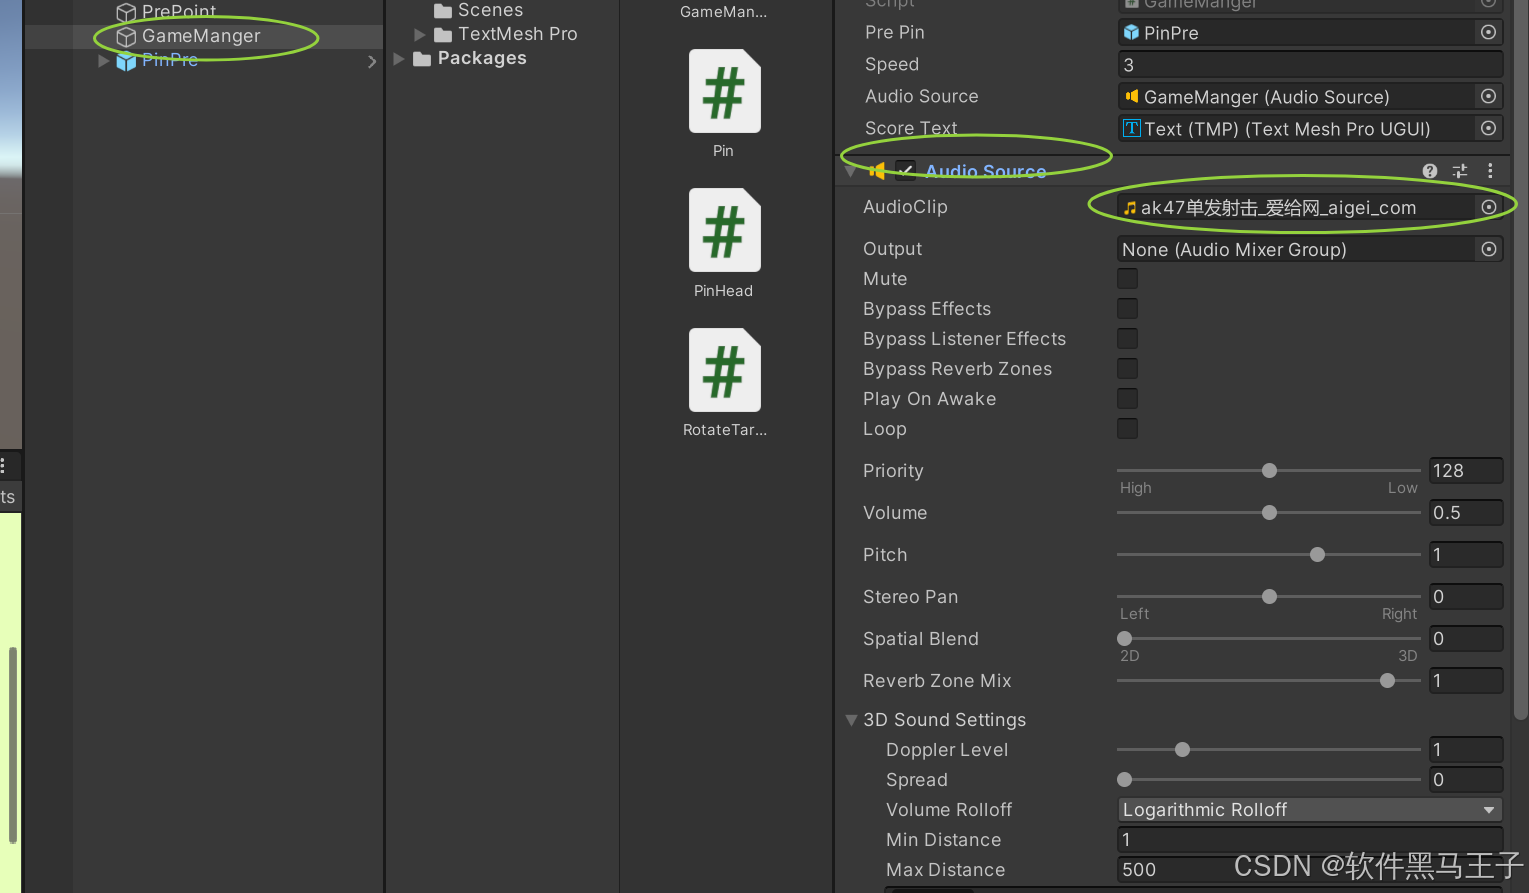
(2)利用代码激活音效(每次发射的时候激活音效)
  public AudioSource audioSource;//射击音效
 void Update()
 {
    ......
     if (Input.GetMouseButtonDown(0))
     {
        ......
         // 播放音效
         if (audioSource != null&&audioSource.clip!=null)
         {
             audioSource.Play();
         }
        ......
     }
 }
五.结语
本次实践不仅展示了如何运用 Unity 引擎的各项功能进行游戏开发,还让我们深入理解了游戏中各元素间的协同运作原理。希望这份详细的制作指南能为初学者提供清晰的学习路径,也期待开发者们基于此进一步拓展和创新,创造出更多精彩有趣的游戏作品,在游戏开发的广阔天地中不断探索前行。

分享前沿Unity技术干货和开发经验,精彩的Unity活动和社区相关信息
更多推荐
 28
28 0
0- 0


 已为社区贡献16条内容

所有评论(0)